Christmas just isn’t the same without Santa, right? And I think Christmas this year isn’t the same without Star Wars. So I decided to combine the two and make Santa Storm Trooper Cookies. Awesome, right? I swear, your family is going to love these. Hey I bet even Santa will too!

Supplies Needed to Make Santa Storm Trooper Cookies:
For Cookies:
- 2 1/2 Cups Flour
- 1 Teaspoon Baking Soda
- 1 Teaspoon Cream of Tartar
- 1 1/2 Cup Powdered Sugar
- 1 Egg
- 1 Teaspoon Vanilla
- 1 Cup Unsalted Sweet Cream Butter, softened
- Skull Cookie Cutter (used upside down)
- Santa Hat Cookie Cutter
For Royal Icing:
- 2 Egg Whites
- 1 C Powdered Sugar
- 1/2 Teaspoon Cream of Tartar
- 1 Teaspoon of Vanilla Extract
- Red Gel Food Coloring
- Green Gel Food Coloring
- Black Gel Food Coloring
- #2 Icing Tip
How to Make Santa Storm Trooper Cookies:
For Cookies:
Cream butter, sugar, vanilla and egg in a mixing bowl until well combined.
In a small bowl, add the dry ingredients and mix until well combined.
Gradually pour in dry ingredients into the wet ingredients bowl and mix until well combined.
Once all ingredients are mixed and a dough ball has formed. (if still sticky add in a half cup of flour and mix until a firm ball of dough forms.) Place dough into a ziplock bag or in a bowl with foil to place on top.
Place in fridge for 2 hours so that the dough can rise. Note: It won’t double in size like bread dough.
Pull dough out of fridge and let it sit on the counter for 1 hour.
Preheat oven to 350 degrees.
Roll dough out and using the skull cutter upside down, cut out cookie. Using the santa hat, cut outcookies. Take the skull cutter and using it upside down cut out the top part of the skull in the hat.
Using the skull cookie you cut before, attach the skull and the hat together. You can do this by gently using your fingers to ply the dough of the 2 cookies together.
Place on parchment covered cookie sheet and place into oven.
Bake for 8 minutes.
For Royal Icing:
Separate the egg yolk from the whites and put the egg whites into a mixing bowl and trash the rest of the egg.
Add the sugar, cream of tartar and vanilla extract to the egg whites.
Beat on medium speed for 6 minutes. Note: If the icing has a yellowish color and looks like soup add in more powder sugar (about 1 cup).
Once the icing is done, pour it into a container that has a lid to it.
Divide the icing into 4 bowls. Put more of the white icing into the bowl for white and less into the other bowls for the other colors.
Add in a few drops of black coloring into the black bowl and mix until combined. Add in more black to get the black that you want for the Stormtrooper.
Repeat step 6 with the remaining colors.
Scoop a small amount of the icing colors into 4 different piping bags that have a #2 icing tip on the bottom.
For the white and red icing, add in 1-3 tablespoons of water to thin the icing out. You want it to be thick and runny, not soup like. If it is soup like add in 1/4 cup of powder sugar to thicken it.
To Create the Stormtrooper:
- Outline each of the cookies in white icing except for the top part where the hat connects to the top. Allow to dry for about 30 seconds before filling in the cookie with the thinner white icing.
- Using the red icing, outline the center part of the santa hat, then fill in with the red thinner icing.
- Let the red dry for 30 minutes before doing the white for the hat.
- Using the white icing, outline the bottom part of the hat in white icing for the trim as well as the white ball on top.
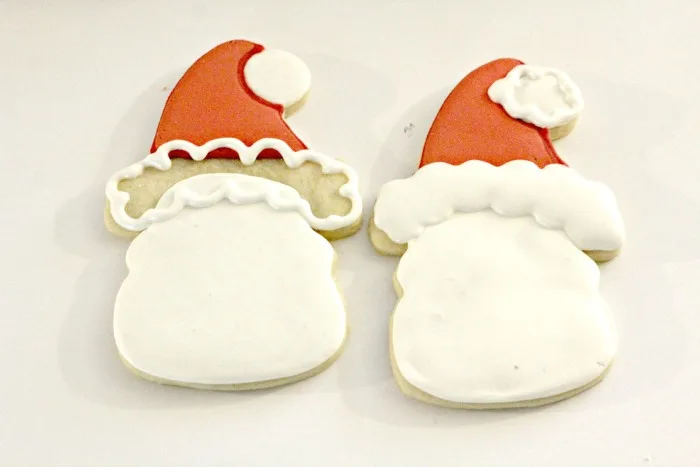
- Again, let the cookie dry for a hour before adding the black to make stormtrooper‘s face.
- Using the green icing bag, pipe on the holly in a corner of the santa hat.
- Using the red icing, add in 3 red dots to make berries.
- Allow the cookies to dry for 5-10 hours before serving or wrapping to gift.



Santa Storm Trooper Cookies
Ingredients
Cookies
- 2 ½ Cups Flour
- 1 teaspoon Baking Soda
- 1 teaspoon Cream of Tartar
- 1 ½ Cup Powdered Sugar
- 1 Egg
- 1 teaspoon Vanilla
- 1 Cup Unsalted Sweet Cream Butter softened
- Skull Cookie Cutter used upside down
- Santa Hat Cookie Cutter
Royal Icing
- 2 Egg Whites
- 1 cup Powdered Sugar
- ½ teaspoon Cream of Tartar
- 1 teaspoon of Vanilla Extract
- Red Gel Food Coloring
- Green Gel Food Coloring
- Black Gel Food Coloring
Instructions
For Cookies:
- Cream butter, sugar, vanilla and egg in a mixing bowl until well combined.
- In a small bowl, add the dry ingredients and mix until well combined.
- Gradually pour in dry ingredients into the wet ingredients bowl and mix until well combined.
- Once all ingredients are mixed and a dough ball has formed. (if still sticky add in a half cup of flour and mix until a firm ball of dough forms.) Place dough into a ziplock bag or in a bowl with foil to place on top.
- Place in fridge for 2 hours so that the dough can rise. Note: It won’t double in size like bread dough.
- Pull dough out of fridge and let it sit on the counter for 1 hour.
- Preheat oven to 350 degrees.
- Roll dough out and using the skull cutter upside down, cut out cookie. Using the santa hat, cut outcookies. Take the skull cutter and using it upside down cut out the top part of the skull in the hat.
- Using the skull cookie you cut before, attach the skull and the hat together. You can do this by gently using your fingers to ply the dough of the 2 cookies together.
- Place on parchment covered cookie sheet and place into oven.
- Bake for 8 minutes.
For Royal Icing:
- Separate the egg yolk from the whites and put the egg whites into a mixing bowl and trash the rest of the egg.
- Add the sugar, cream of tartar and vanilla extract to the egg whites.
- Beat on medium speed for 6 minutes. Note: If the icing has a yellowish color and looks like soup add in more powder sugar (about 1 cup).
- Once the icing is done, pour it into a container that has a lid to it.
- Divide the icing into 4 bowls. Put more of the white icing into the bowl for white and less into the other bowls for the other colors.
- Add in a few drops of black coloring into the black bowl and mix until combined. Add in more black to get the black that you want for the Stormtrooper.
- Repeat step 6 with the remaining colors.
- Scoop a small amount of the icing colors into 4 different piping bags that have a #2 icing tip on the bottom.
- For the white and red icing, add in 1-3 tablespoons of water to thin the icing out. You want it to be thick and runny, not soup like. If it is soup like add in 1/4 cup of powder sugar to thicken it.
To Create the Stormtrooper:
- Outline each of the cookies in white icing except for the top part where the hat connects to the top. Allow to dry for about 30 seconds before filling in the cookie with the thinner white icing.
- Using the red icing, outline the center part of the santa hat, then fill in with the red thinner icing.
- Let the red dry for 30 minutes before doing the white for the hat.
- Using the white icing, outline the bottom part of the hat in white icing for the trim as well as the white ball on top.
- Again, let the cookie dry for a hour before adding the black to make stormtrooper‘s face.
- Using the green icing bag, pipe on the holly in a corner of the santa hat.
- Using the red icing, add in 3 red dots to make berries.
- Allow the cookies to dry for 5-10 hours before serving or wrapping to gift.
Nutrition information is a rough estimate only; actual values will vary based on the exact ingredients used and amount of recipe prepared.



Christmas Snowball Cookies (Nut Free) | Simplistically Living
Monday 16th of November 2020
[…] Storm Trooper Santa Cookies […]
10+ Amazing DIY Decorated Star Wars Cookies with Instructions - Comic Con Family
Sunday 3rd of June 2018
[…] Santa Storm Trooper Cookies by Simplistically Living […]
Star Wars Inspired Crafts, Recipes and Party Ideas and Block Party - Rae Gun Ramblings
Sunday 3rd of January 2016
[…] minute Star Wars Blankets | Star Wars Chocolates | Light saber treats|Princess Leia Buns | Storm Trooper Santas | light saber pencils | Star Wars Sign | Princess Leia Cupcakes | Bantha Cocoa | Wookie […]
Star Wars Christmas Ideas: Food, Fun and Crafts | Desert Chica
Wednesday 23rd of December 2015
[…] 17. Star Wars Snowflakes | Anthony Herrera Designs 18. Star Wars Droid Ornaments | DIY Candy 19. Santa Storm Trooper Cookies | Simplistically Living 20. DIY Star Wars Felt Ornaments | DIY Geekery 21. Star Wars Lawn Ornaments […]
Star Wars Holiday Gift Ideas
Monday 7th of December 2015
[…] if you are hosting a holiday get-together this season, these Santa Stormtrooper cookies by Brittanie of Simplistically Living will make your party a […]